Here's the airbox as removed from the TY.
I've stripped it down, blasted and painted it with Hycote Barbeque Paint. I found a better flexible connector, and all new Yamaha fixings, inc new 'jubilee' clips. I heat shrank some black tubing on the arm that clips over the frame, added a NOS filter and mounted it all up.
Overall I was very pleased with the way this went.
A Diary Following the Restoration of my 70's & 80's Motorcycles & Associated Notes & Ramblings. Mainly Yamaha & Trail / Trial / Enduro Biased.
Showing posts with label Frame. Show all posts
Sunday, 16 December 2012
Monday, 9 April 2012
TY175: Rear Mudguard
This was a bit of a battle. I started with a new pattern rear guard, a NOS Yamaha inner metal guard, and all brand new Yamaha NOS fixings, grommets, etc.
So I offerd it all up, and with a lot of pushing, pulling and swearing, I managed to get all the fixings in, but, the mudguard was kinked, and under a lot of stress.... So, scratch head, and back to workbench.
As the inner guard was genuine Yamaha, I figured that would be the best alignment of the mounting holes. But, against my frame, the rear hole needed a little elongation to fit. You can just see it below.
I then had to elongate the three holes in the plastic guard to match the 3 mounts on the inner guard. Once this was done, it all mounted up OK. I had to add a washer to the rearmost mount, on the visible top of the plastic guard to hide the elongated hole, but it's not noticeable.
Below are some general shots of where the build is at.
So I offerd it all up, and with a lot of pushing, pulling and swearing, I managed to get all the fixings in, but, the mudguard was kinked, and under a lot of stress.... So, scratch head, and back to workbench.
As the inner guard was genuine Yamaha, I figured that would be the best alignment of the mounting holes. But, against my frame, the rear hole needed a little elongation to fit. You can just see it below.
I then had to elongate the three holes in the plastic guard to match the 3 mounts on the inner guard. Once this was done, it all mounted up OK. I had to add a washer to the rearmost mount, on the visible top of the plastic guard to hide the elongated hole, but it's not noticeable.
Below are some general shots of where the build is at.
Sunday, 8 January 2012
TY175: Brakes and Forks Update
Here's a longer update on activity over the recent break:
Front Brake:
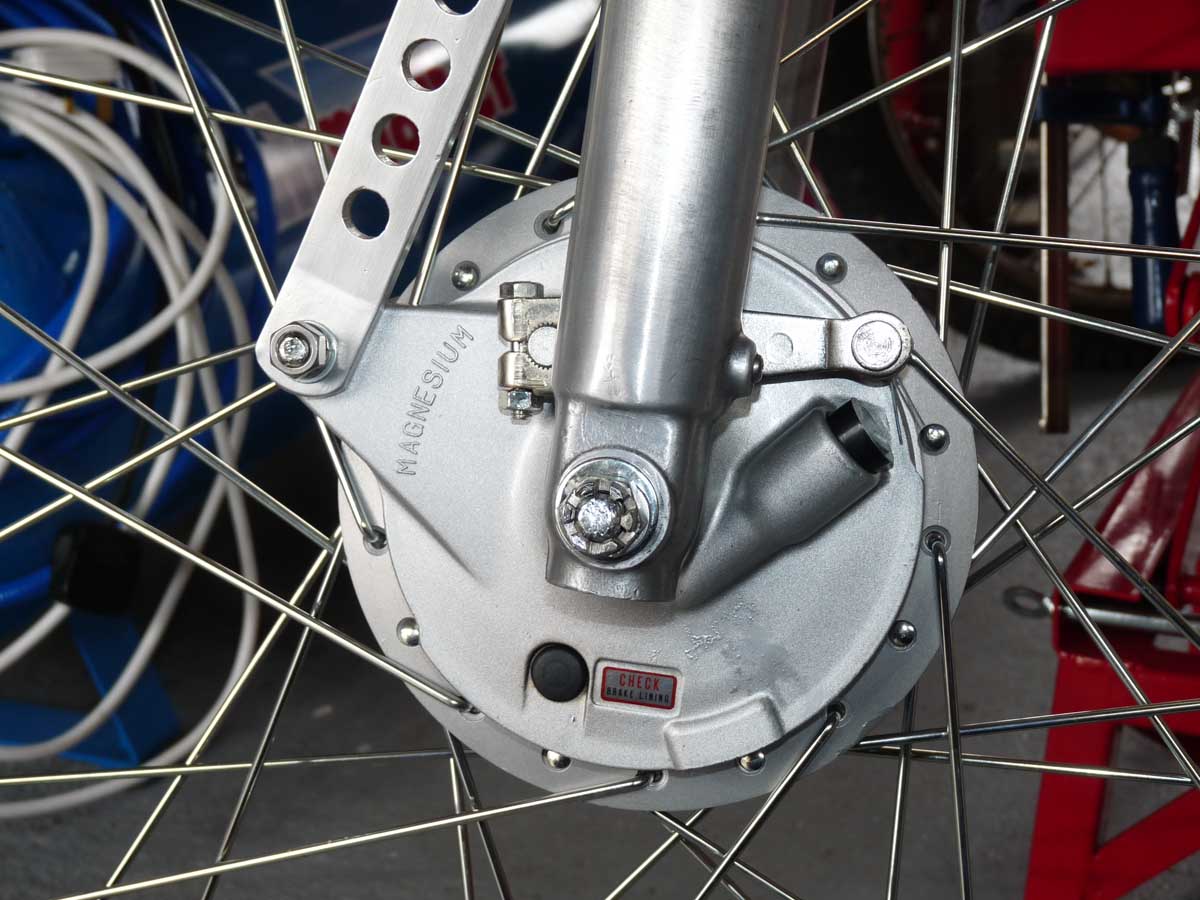
I touched up the NOS (New Old Stock) brake plate with Humbrol silver modelling paint, rather than stripping and refinishing it. I think it came out OK.
As this brake plate came with no speedo internals, I bought the worm gear parts from CMSNL (see link at top of page), and used the drive parts that engage with the wheel from my old plate.
And adding new brake shoes, and the re-zinc'ed arm and cam, etc, I ended up with this:
I polished the alloy torque arm and along with the re-zinc'ed spindle, etc, I loosely installed the brake plate as below.
Forks:
You'll see here, that the forks are in. That's another job carried out. I cleaneed up (but not highly polished) the fork bottoms using scotchbrite pads in an electric drill. I've left the bottoms as bare ally, I'll not paint them. As you can see, they may still need a little polishing tweak just to 'average out' the scotchbrite marks. But, following earlier work on the yolks, I found the finish naturally mellows over time to a more even look, so hopefully, the legs will settle down too.
I installed new taper head bearings, and using re-zinc'ed original bolts for all except the handle bar clamps which are NOS Yamaha bolts, I re-fitted the yorks.
The forks are supposed to extend out of the top yolk by 20mm or so. I found NOS cable guides (one on each fork) from an eBay ad in Australia. My reference photos from Yamaha brochures seem to say to keep the left hand cable guide (RHS in image below) down as low as possible. NOTE: I've just realised that both guides should be on the same side as the lower guide (see ref images below), ie, both should be on LHS of the bike! I'll change that later! Although my parts books show the top guide on RHS.
Extracts from my ref images:
Rear Brakes:
Again, I touched up the NOS rear brake plate with Humbrol paint, rather than refinishing it.
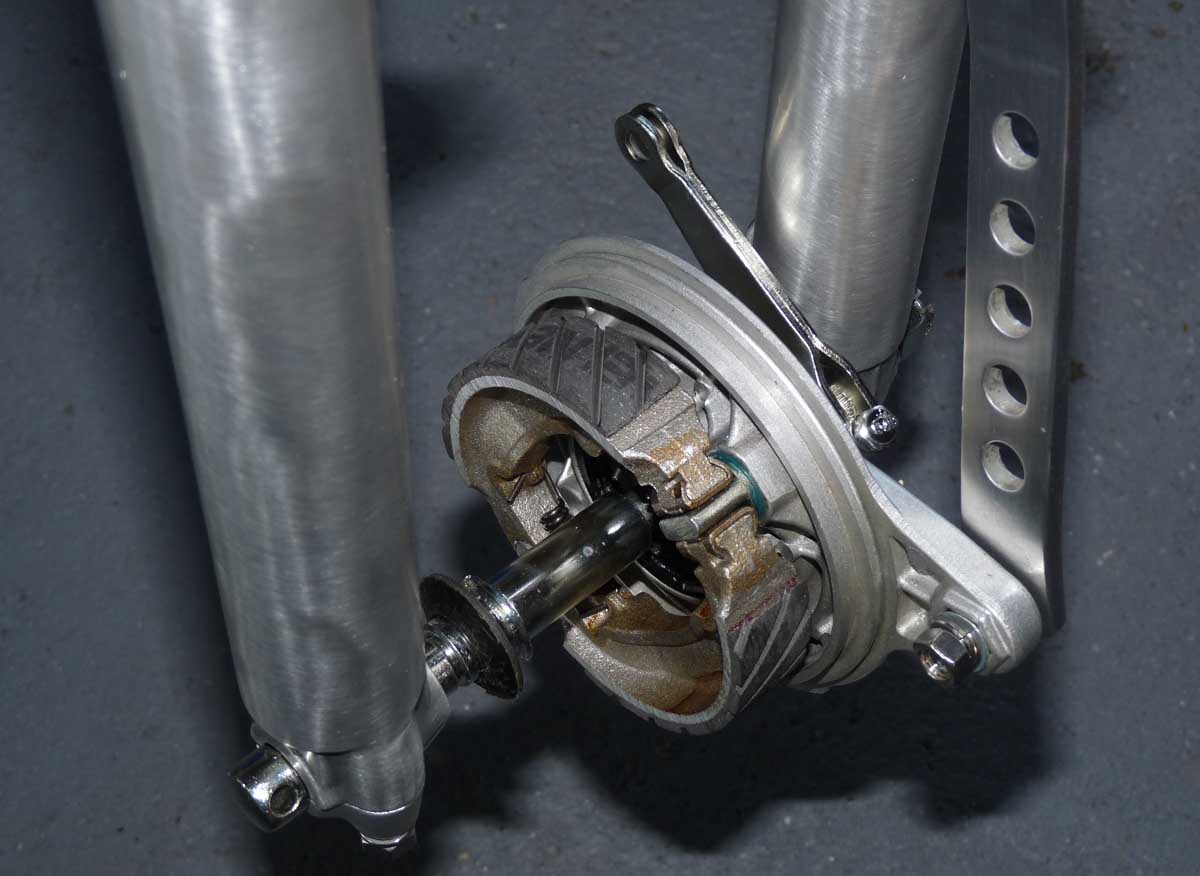
Then added in the new pads, and re-zinc'ed original arm and cam, etc
And along with the polished torque arm, loosely inserted the brake along with re-zinc'ed spindle, spacers, adjusters, etc.
That pretty much completes the xmas break work on the bike. All coming along nicely. The sharp eyed will have noticed the tank installed at one point. This is my unfinished tank, and installed just to check if the forks cleared the tank on full lock. They didn't on left hand lock by less than a mm. I wish I'd have checked that before I had the frame painted, as I could have built some weld up on the stop. So, I'll just stick a small rubber pad on that stop (or more probably, both stops to keep things even) just to protect the tank once it's painted.
Front Brake:
I touched up the NOS (New Old Stock) brake plate with Humbrol silver modelling paint, rather than stripping and refinishing it. I think it came out OK.
As this brake plate came with no speedo internals, I bought the worm gear parts from CMSNL (see link at top of page), and used the drive parts that engage with the wheel from my old plate.
And adding new brake shoes, and the re-zinc'ed arm and cam, etc, I ended up with this:
I polished the alloy torque arm and along with the re-zinc'ed spindle, etc, I loosely installed the brake plate as below.
Forks:
You'll see here, that the forks are in. That's another job carried out. I cleaneed up (but not highly polished) the fork bottoms using scotchbrite pads in an electric drill. I've left the bottoms as bare ally, I'll not paint them. As you can see, they may still need a little polishing tweak just to 'average out' the scotchbrite marks. But, following earlier work on the yolks, I found the finish naturally mellows over time to a more even look, so hopefully, the legs will settle down too.
I installed new taper head bearings, and using re-zinc'ed original bolts for all except the handle bar clamps which are NOS Yamaha bolts, I re-fitted the yorks.
The forks are supposed to extend out of the top yolk by 20mm or so. I found NOS cable guides (one on each fork) from an eBay ad in Australia. My reference photos from Yamaha brochures seem to say to keep the left hand cable guide (RHS in image below) down as low as possible. NOTE: I've just realised that both guides should be on the same side as the lower guide (see ref images below), ie, both should be on LHS of the bike! I'll change that later! Although my parts books show the top guide on RHS.
Rear Brakes:
Again, I touched up the NOS rear brake plate with Humbrol paint, rather than refinishing it.
Then added in the new pads, and re-zinc'ed original arm and cam, etc
And along with the polished torque arm, loosely inserted the brake along with re-zinc'ed spindle, spacers, adjusters, etc.
That pretty much completes the xmas break work on the bike. All coming along nicely. The sharp eyed will have noticed the tank installed at one point. This is my unfinished tank, and installed just to check if the forks cleared the tank on full lock. They didn't on left hand lock by less than a mm. I wish I'd have checked that before I had the frame painted, as I could have built some weld up on the stop. So, I'll just stick a small rubber pad on that stop (or more probably, both stops to keep things even) just to protect the tank once it's painted.
Saturday, 24 December 2011
TY175: Autolube Tank
As the TY didn'y come with an Autolube Tank, I bought this one from eBay to refurbish:
Then, I bought a box of TY bits, again from eBay, and without knowing it, there was a near enough brand new tank in there:
So, with the hinge piece from the old one just back from zinc plater, I pu this together with some NOS, and some existing parts:
It came up rather well, I think. And, here it is fitted. Along with the NOS chain gaurd and repro side panel from TY Trials:
Then, I bought a box of TY bits, again from eBay, and without knowing it, there was a near enough brand new tank in there:
So, with the hinge piece from the old one just back from zinc plater, I pu this together with some NOS, and some existing parts:
Thursday, 22 December 2011
TY175: eBay NOS Bash Plate
I spent far too much money on this brand new, nos, never used bash plate / sump gaurd. However, as even really bad ones seem to be north of £40 on eBay, I think it was OK.
Sunday, 18 December 2011
NVT Poster Brochure
Here's a scan of both sides of an A2 (A4 folded twice) size fold out brochure for the NVT range in late '70's.
Ramblers
—something a little different on the street/trail scene. Take another look at
the Rambler picture and maybe you will see what we mean. You have probably
already noticed the front disc brake but what about the cantilever rear
suspension ? Or the rubber headlight? And who else supplies a chrome luggage grid
within the basic price of the bike?
NVT
took along hard look at the street/trail market before we embarked on our
Rambler project. It is a young man’s market - these single cylinder dual purpose
devices - but the buyers know their machines through and through ; all in all they’re
a pretty discerning bunch. Not all of them ride on the rough but they like to
know the bike will do it, if required. They demand looks and performance for
town riding plus the specification of a twin cylinder sports machine for that
trip into the country. So our brief was to provide all the obvious qualities that
the British Companies do best. Things like a frame that, from the very first
weld, is designed to handle with a capital ’H'!
Lighter
too, and more rigid than the opposition. Next came the general geometry. We
chose a compact 52.5" wheelbase, dialled in plenty of suspension movement,
and arranged everything else to give a riding position that felt right, for everyone
- at least, all those in the 5’ 4" to 5' 10" mould! Oh yes, some of
our test riding was done with a slip of a girl on the back, so no worries
there...
NVT's
policy on outside suppliers is to go to the industry leader in each speciality.
For the Rambler we therefore chose engines from the world's most successful
manufacturer of off-road motorcycles. We simply fit these engines and forget
about them, secure in the knowledge that they are the most proven
product
available.
The
same policy applies to our forks and brakes. Famous makers both, producing
their well-known components especially for us, to our dimensions.
Finally,
as you can see, the Rambler is a very appealing marriage of all the best parts
one could possibly imagine. A
handsome, rugged bike indeed. But don't just take our word for it. Check one
out at your NVT Dealer today.
Here's a close up of the naked frame shown on this brochure:
Sunday, 11 December 2011
TY175: Todays Progress
I realised that I'd not removed the old swing arm spindle and bushes before I sent the arm off for painting. So, with trepidation, I removed the old bushes, cleaned up the spindle and put new bushes in, along with new shim washers, grease nipple and dust caps. I then fitted the arm.
I bought a cheap pair of shocks from eBay that look just about correct, but probably don't perforn brilliantly. But, as I don't intend to ride this bike much, I'd rather it looked the part.
Here's an extract of a press photo to show how close the shocks are (or aren't!)
I went on to loosley mount the foot pegs. I had some pattern foot peg springs that I used, but, they don't sit perfectly. I'll need to see if I can get NOS springs, that hopefully fit better. That can wait for now though. I also fitted the stand, with NOS genuine spring, nut and bolt.
All threads have copaslip on them. I sat the seat loosely in place too.
This is satisfying!
I bought a cheap pair of shocks from eBay that look just about correct, but probably don't perforn brilliantly. But, as I don't intend to ride this bike much, I'd rather it looked the part.
Here's an extract of a press photo to show how close the shocks are (or aren't!)
I went on to loosley mount the foot pegs. I had some pattern foot peg springs that I used, but, they don't sit perfectly. I'll need to see if I can get NOS springs, that hopefully fit better. That can wait for now though. I also fitted the stand, with NOS genuine spring, nut and bolt.
All threads have copaslip on them. I sat the seat loosely in place too.
This is satisfying!
Subscribe to:
Posts (Atom)